If you no longer have an iPhone, iPad, iPod touch, Mac, or Apple Watch because you gave it away or sold it, you need to remotely erase it before you can remove it.
In Find My iPhone on iCloud.com, click All Devices, then select the device you want to erase. If you don’t see All Devices, it’s because you’ve already selected a device. Click the name of the current device in the center of the toolbar to access the Devices list, then select a new device.
Erase the device. Because the device isn’t lost, don’t enter a phone number or message. If the device is offline, the remote erase begins the next time it’s online. You receive an email when the device is erased.
When the device is erased, click Remove from Account. All your content is erased, and someone else can now activate the device.
All your content is erased, and someone else can now activate the device.
WARNING: DO NOT PLUG YOUR LIQUID DAMAGED PHONE INTO A CHARGER OR ATTEMPT TO POWER IT ON!!!
When a phone comes into contact with liquids usually the first thing that comes to mind is to “put your phone in rice”, right? but this is counter-intuitive and will do more harm than good, you are doing absolutely nothing to rid your phone of the liquid that is causing corrosion of the electronic components inside your device. The rice does not absorb moisture, this is a common misconception that we often hear. The only thing you can do to give your phone a better chance of survival especially if the data contained inside is of any importance is to get it to a data recovery specialist.
Electronics and liquid do not mix so if you have a device that has come into contact with liquid the last thing you want to do no matter how tempted you are to do so; is to plug it in a charger. If your phone will not turn on after coming into contact with liquid its because a component inside the phone has a short to ground by the conductivity of the solution, (not the ground beneath your feet but the electrical kind).
So plugging in your liquid damaged device to a charger will pump more electricity into ground or whatever component on the board that is shorted which will do nothing except more damage! So when someone says it has a “short” they are saying that there is a short to ground, all of the power in the affected circuit is no longer going where it should but instead getting pumped into ground which as a byproduct produces heat.
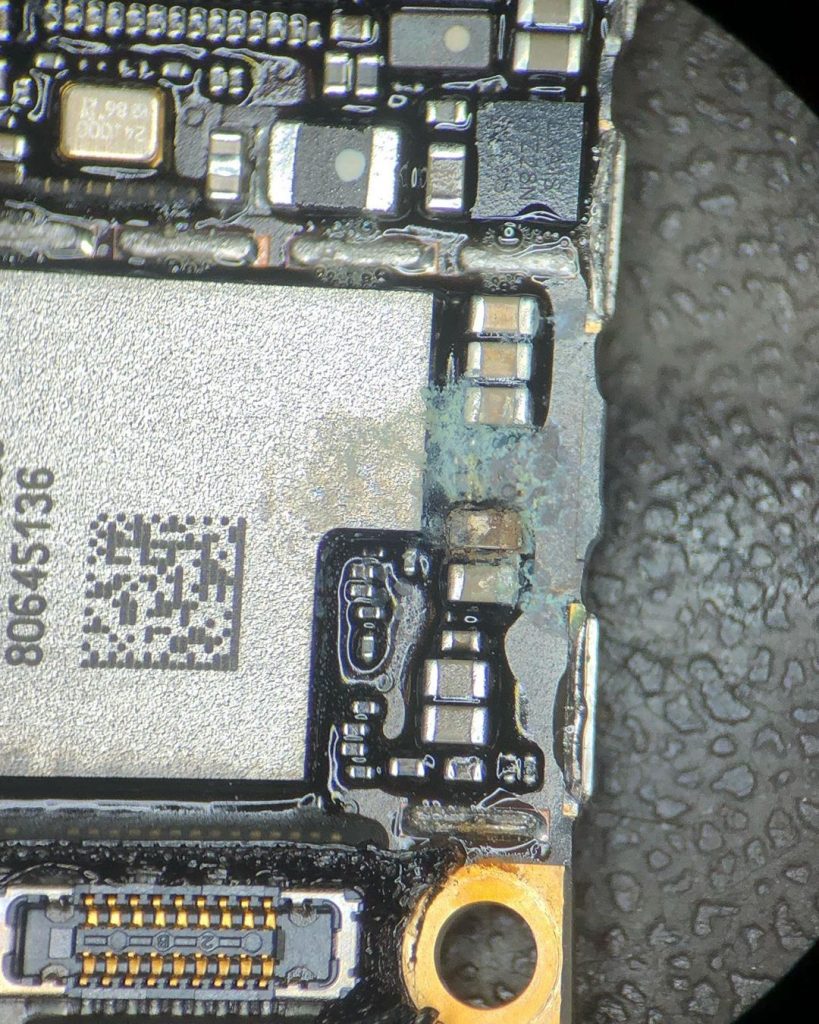
Here is an example of liquid damage that we have seen, on the right is an iPhone that is supposed to be water-resistant. That is another point that needs to be addressed, there is no such thing as a waterproof phone (as of today). All phones are rated as water-resistant to certain depths. Most phones can survive the rain however I would not trust their water-resistance any further than that. Cases also help as long as they are rated as water-resistant.
The quicker you get your phone to an engineer experienced in iPhone data recovery the better the chances of getting your data back! We define experience as a business that offers data recovery as a service. Don’t be fooled “liquid damage treatment” is not the same as data recovery! A business that offers data recovery as a service will have the specialized tools and schematics necessary to give you the best chance of success. Speaking of success prismatic technology has a 95% recovery success rate!! If you have accidentally dropped your phone in water or any other kind of liquid and need your data, give us a call 1-876-539-74151-561-806-8969 or click this What’s App link as soon as possible!!
Windows 10 in S mode is designed for security and performance, exclusively running apps from the Microsoft Store. If you want to install an app that isn’t available in the Microsoft Store, you’ll need to switch out of S mode. Switching out of S mode is one-way. If you make the switch, you won’t be able to go back to Windows 10 in S mode. There’s no charge to switch out of S mode.
On your PC running Windows 10 in S mode, open Settings > Update & Security > Activation.
In the Switch to Windows 10 Home or Switch to Windows 10 Pro section, select Go to the Store. (If you also see an “Upgrade your edition of Windows” section, be careful not to click the “Go to the Store” link that appears there.)
On the Switch out of S mode (or similar)page that appears in the Microsoft Store, select the Get button. After you see a confirmation message on the page, you’ll be able to install apps from outside of the Microsoft Store.
When your Mac won’t load or hangs on startup it’s not the end of the world. You still have pretty good chances of fixing it, even without a technician’s help. Before you read next, check if your Mac is plugged in. Your first guess should be your Mac has run out of battery. If it’s not the case, you are welcome to try some of the following easy tips.
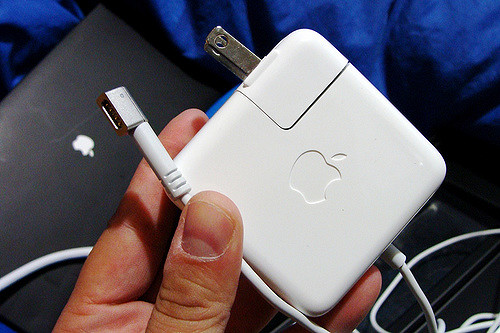
1. Check your charger’s cable
Carefully examine the cable along its full length to see if the charger is intact and all connections are in place. Also, check the AC power socket is working. To isolate the source of the problem, look into the following:
Does your Mac make any noise? If the fans are working but you can’t hear any other sounds, this might indicate logic board failure.
Could it be the display? Press the Caps Lock to see if it lights on. If it glows, then your display is probably off.
Quick fact:
Sometimes your Macbook wouldn’t start because of a broken application that affects the startup, quite possibly, an antivirus software. To solve the issue, uninstall the unwanted app with CleanMyMac (or similar app) while in the Safe mode.
2. MacBook won’t boot? Start it in a Safe mode
Safe mode limits the macOS to its most basic functions while allowing you to recover your Mac. Sometimes it’s the single most effective solution when your Mac won’t turn on, or continuously crashes.
Press the Power button while holding down Shift Release the Shift key after login dialogue shows up
Did your Mac wake up? Congrats, you’re in the Safe mode. At this point, you at least have some freedom of action to investigate and troubleshoot the issue. While in the Safe mode, you might try running a couple of maintenance utilities.
3. Perform the special power cycle
There are cases when your Mac wouldn’t start despite being normally plugged in, even with a green power indicator glowing. You may try rebooting your MacBook in a special mode, called “special power cycle” which involves the following steps.
Unplug the power cable.
Hold down the Power button for about 10 seconds.
Without releasing the Power button connect the power cable.
Wait 10 more seconds holding it.
Let go of a button and start your Mac in a normal way.
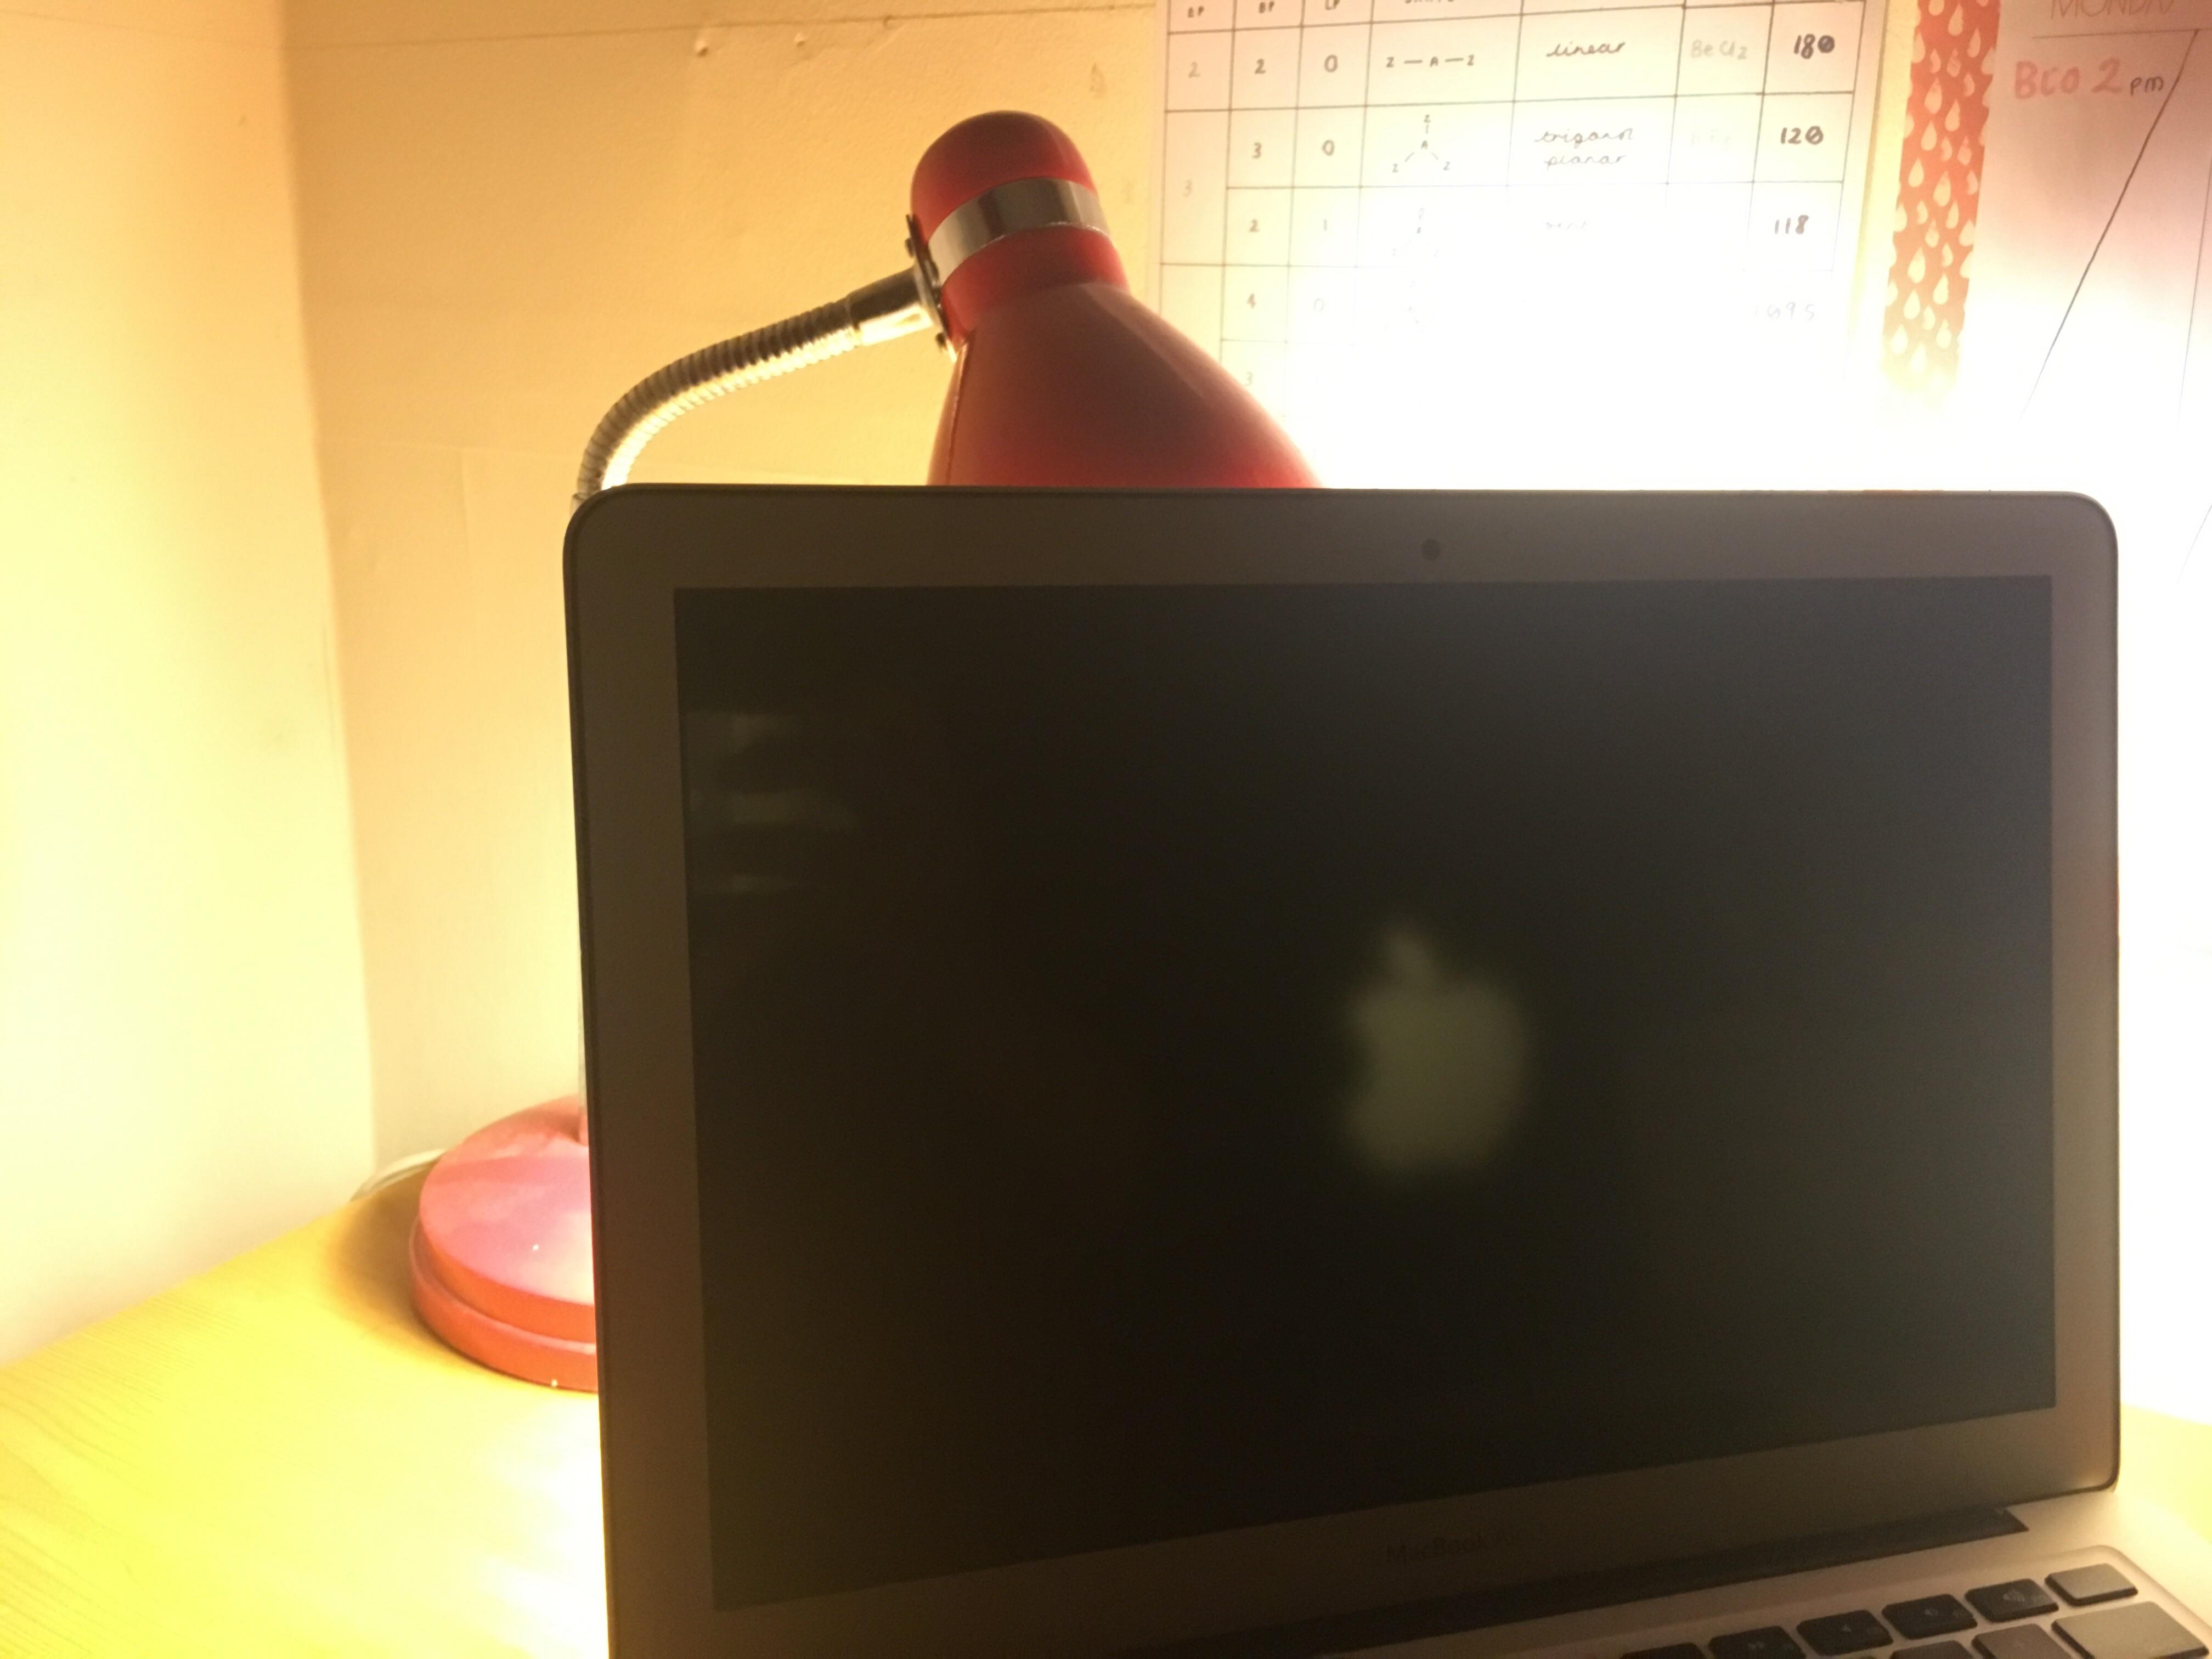
4. Fixing a Mac booting to black screen
The common issue reported on many Apple forums is Mac’s screen going black on startup. This is typically followed by the recurring “Reset Password” message. The problem appears to be somehow concerned with the battery power circuit with Mac failing to light up the screen. There is a fairly simple solution to it, though, quite an odd one — involving a flashlight or a lamp. The trick works because your login screen is still there but you can’t see it.
Image source: Reddit
Shine the flashlight through the Apple logo on the back of your screen. Bringing this extra light should help you see the login icon and you’ll be able to put the cursor in the right spot and log in. The screen should light up normally right after that. A variant of this solution is to shine a flashlight across the screen from left to right (on the front side of the screen). Try this in a dark room for greater effect.
5. Reset System Management Controller (SMC)
System Management Controller is responsible for many ground-level functions of your Mac. Among those are battery settings, display reactions, and specifically the Power button functions. Use the following technique to reset SMC if your MacBook won’t load.
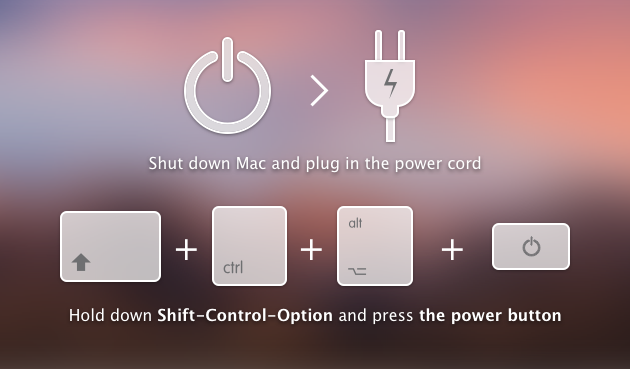
If your MacBook’s battery isn’t removable:
Shut down Mac and plug in the power cord.
Press Shift-Control-Option, then press the Power button.
Hold the keys for about 10 seconds.
Release the keys.
Press Power as you would normally start your Mac.
If you have a Mac with removable battery:
Take out the battery
Press and hold the Power button for about 5 seconds
Re-insert the battery and press Power button again
If you’re on a desktop Mac or Mac Pro:
Unplug the power cable
Give it 15 seconds
Plug the cable back in
Wait 5 more seconds and press Power again
6. Try Recovery Mode when the Mac won’t load
If the issue repeats and your Mac won’t turn on again, you can try some of these:
Set your Mac back using Time Machine
Reinstall the operating system
Use Disk Utility to recover your drive
Run some dedicated Mac maintenance app
All these options are available via Recovery mode—not to confuse with the Safe mode—and to enter it you’ll need to once again press a few spell-invoking special buttons. Needless to say, they are of no use if your MacBook won’t load in the first place.
How to enter Recovery mode:
Got to Apple menu > Restart Wait for Mac’s startup sound Immediately press and hold Command + R Don’t release the keys until you see the Apple logo
Give your Mac a bit of time to load and you’ll be taken to Utilities. From there on, you’ll see several to recover your Mac.
A few more reasons your Mac won’t turn on
Putting hardware-related issues aside, there would be still many explanations for your Mac’s misbehavior. But to give you a perspective, here are a few more ideas to check:
Corrupted caches: critical system files from the boot sector are corrupted.
Incompatible Login Items: some apps may affect the boot process.
Broken hard disk permissions: conflicting user accounts
If you have an iPhone 7 or 7 Plus, there’s a chance you might be experiencing an issue with your Audio IC. You will sometimes see a “Recording Failed” or “No Audio Devices” error when trying to record a voice note using the Voice Memo App. Or sometimes you cannot put the phone in loudspeaker mode. It will vary depending on the severity of the damage.
Some of the Audio IC symptoms include:
No mic or no speaker.
Speaker button grayed out during a call
Voice Memo app not working
“Recording Failed” error
“No audio devices found” error
iPhone stuck on the Apple Logo but the home button is clickable
iPhone takes 5-10 minutes to boot up
Static noises coming from ear speaker
and more.,
For example:
Why does this happen?
One cause of this issue is the main logic board being in constantly stressed. The Audio Codec chip that is responsible for the audio functionality of the iPhone is located at a part of the board that tends to bend a lot. So over time, the chip develops stress cracks and eventually fails.
How to fix the Audio IC permanently
Please note: this repair requires advanced micro soldering skills to achieve a permanent and safe repair. Especially with the iPhone 7 and 7 Plus, it is very easy to overheat the board and damage other components or cause the board to fail entirely. So take it to a professional, like us here at Prismatic Technolgy.
Do you need this repair done?
Lifetime Warranty
Same day Turnaround
Located in Kingston, JA
Mail-In Service available (additional shipping charges may apply)
B2B pricing available for repair shops
Please contact us today, if you would like to schedule an appointment or have any questions.
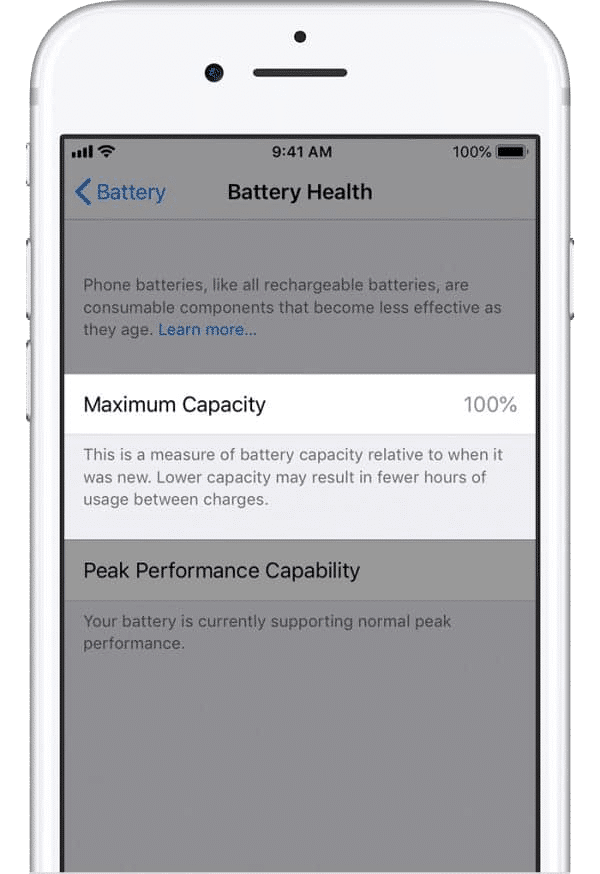
The iPhone XS, XR, and XS Max will display a message saying their batteries need to be serviced if they’re not replaced by Apple, . The message appears in both iOS 12 and the iOS 13 beta, and is shown regardless of whether a genuine Apple battery has been installed in the phone — it all comes down to whether Apple or one of its Authorized Service Providers installed the replacement.
If you go into the “Battery Health” menu when the “Service” message appears, then you’ll be presented with an “Important Battery Message” that reads “Unable to verify this iPhone has a genuine Apple battery. Health information not available for this battery.” The message replaces the standard percentage indicator that typically shows the health of the battery that’s currently installed in the phone.“HEALTH INFORMATION NOT AVAILABLE FOR THIS BATTERY”
Although iFixit notes that these messages do not appear to affect the functionality of the battery, it makes it harder to tell when a replacement battery needs to be replaced. A battery could be brand new, or it could be on the point of complete failure, and either way the phone will simply tell you it needs to be serviced. iFixit likens it to an “Oil Change” indicator light in a car that will only turn off if a Ford dealership changes the oil. When contacted, Apple did not respond to our request for comment.
The YouTube channel The Art of Repair reports that the source of the message is a Texas Instruments microcontroller installed on the battery itself, which ordinarily provides information about battery capacity and temperatures to the phone. Microcontrollers like these can be found on most batteries, but in Apple’s case it contains an authentication feature that locks battery replacements down to Apple’s authorized repair technicians.
Effectively, the practice restricts where you can get your iPhone battery replaced, unless you want your phone to lose a piece of its functionality. It discourages you from repairing your phone using one of , or using another third-party repair shop. To Apple’s credit, it has reportedly started allowing its own technicians to repair phones containing third-party batteries, but depending on your location it simply might not be convenient to visit one of the company’s authorized service providers.IFIXIT SELLS ITS OWN HOME BATTERY REPAIR KITS
Having the ability to easily repair your devices is important. Replacing components as they wear out means your phone lasts longer, and this saves you money and results in less waste being sent to landfill. The evidence suggests that people hold onto their phones for longer when they have access to cheap battery repairs; when Apple reduced the price of its battery replacements, so many people took advantage of it that it actually ended up harming the sale of new iPhones.
Apple is keen to be an environmentally friendly company. Its recent Mac mini and MacBook Air computers are made out of 100 percent recycled aluminum and its business is powered by 100 percent renewable energy sources worldwide. Access to repair services is important if Apple wants to keep its company as environmentally friendly as possible.
The desktop right-click menu, otherwise known as the desktop context menu, provides instant access to numerous useful options ranging from aligning desktop icons to customizing display settings. And if you are a long-time Windows user, the means to obsessively refresh the desktop!
Usually, the context menu shows up within a fraction of a second after right-clicking. On certain PCs, however, there’s a strange bug where the menu in fact takes substantially much longer — around 3-5 seconds — to display on screen.
Needless to say, it’s maddening when that happens, especially if you use the menu a lot.
SO WHY DOES THIS HAPPEN?
The context menu lags when it has graphics extensions added to it after installing NVIDIA, AMD, or Intel display drivers. If you see Graphics Properties and Graphics Options (Intel), NVIDIA Control Panel, or AMD Catalyst Control Center listed within the context menu, you now know why.
These items are usually present just for the sake of it and are rarely used for everyday purposes. Hence, you can safely remove them from the context menu and get rid of the issue altogether. But how can you do that?
You have two options; use a third-party utility called ShellExView to identify and disable the additional context menu entries, or use the built-in Registry Editor to achieve the same effect.
ShellExView provides a distinct advantage where you can easily re-enable the graphics options should you need them later. But if you want to remove the extensions permanently and aren’t afraid to mess around with some registry keys, then resort to using the Registry Editor. Needless to say, you should have all your important data on the computer backed up online or on an external drive before proceeding with editing Registry.
USING SHELLEXVIEW
ShellExView is a super-convenient application that lets you disable unnecessary bloat from context menus fast. And don’t worry, it’s completely free to use.
To start off with, simply download ShellExView using the Download button below. Note that the download page lets you select from between an installer, a ZIP file, and a X64 ZIP file.
The installer lets you install ShellExView as a normal application, while both ZIP files contain an executable file that you can use to directly launch the program upon unzipping.NOTE: When opting for the ZIP files, remember to get the normal ZIP file (listed as Download ShellExView in Zip file) if you run a 32-bit version of Windows 10.
After downloading, launch ShellExView and wait for a few seconds while it detects your context menu extensions. Depending on your graphics card, proceed by following the instructions as listed below.
Intel
Intel has two extensions on the context menu, namely Graphics Options and Graphics Properties. Therefore, you need to disable the following entries:
TheDeskTopContextMenu Class (Type: Context Menu)
TheDeskTopContextMenu Class (Type: Property Sheet)
NVIDIA
NVIDIA graphics drivers insert the NVIDIA Control Panel extension. Disable the following entry to get rid of it:
NVIDIA CPL Context Menu Extension
AMD
AMD features the AMD Catalyst Control Center extension, and the following entry lets you disable it:
SimpleShlExt Class (Description: AMD Desktop Control Panel)
That’s it! Simply restart your PC for the changes to take effect, and the desktop right-click menu should load with no delays whatsoever.NOTE: Certain PCs may have a combination of integrated Intel graphics and a separate NVIDIA or AMD graphics card. In that case, you should find extensions for both graphics chipsets on the desktop context menu. Try disabling the Intel extensions first, and if that doesn’t resolve the issue, go for the NVIDIA or AMD extensions next.
If you want to re-enable the extensions later, simply open ShellExView, right-click the disabled item, and then click Enable Selected Items.
There’s nothing worse than your iPhone battery dying really fast. When a battery gets old, it will lose its ability to hold a charge and cause your iphone to run slower. So this is why it is important to change your battery once it is old.
Go to Settings > Battery > Battery Health (Beta) and see what is your Maximum Capacity. If it’s below 80%, we recommend getting it replaced to make sure your phone is running at peak performance. We have OEM batteries in stock.
If you get a low quality battery, you’re likely to still have battery issues & the Battery Health (Beta) menu will say to “Service” your battery.
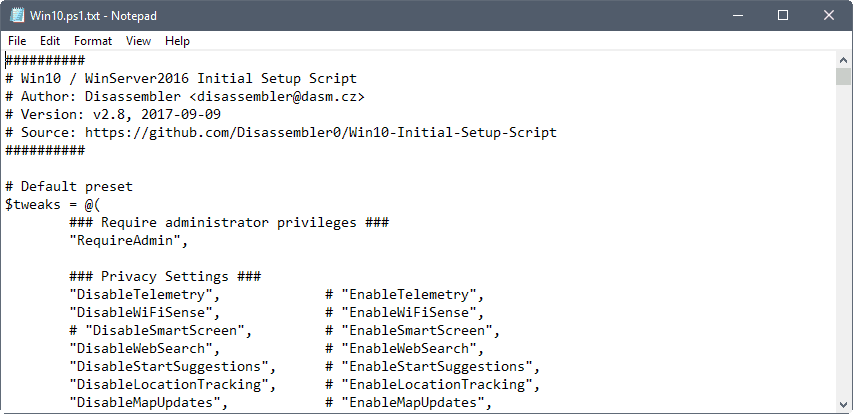
Windows 10 Initial Setup Script is a PowerShell script that you may run on Windows 10 devices to make all kinds of post-setup changes to the operating system.
While it is designed for post-setup operation, it can also be useful after bigger operating system updates that sometimes make changes to the configuration.
The script itself is not designed to be run right away. The developer recommends that users and administrators go through it to enable or disable modifications that it makes.
Since it runs automatically when executed, an option to deal with this while the script is executed is not available.
Windows 10 Initial Setup Script
The first thing that you should do after downloading the latest release version of the script is to open it in a plain text editor to go through it once and adjust what it does based on your requirements.
This may sound complicated, but it is not actually. Basically, all you need to do is go through the first lines of the script as it lists all the tweaks there. A tweak with # in front is a comment, and it won’t be executed.
So, place the # symbol in front of any tweak that you don’t want executed, and save the script afterwards.
The script divides the tweaks and modifications into groups. There is a privacy settings group, one for service tweaks, and another for user interface tweaks for instance.
The main issue that you may run into when you edit the script is that it is sometimes not clear what a tweak does. While it is easy to understand what “DisableAdvertisingID” or “DisableRemoteAssistance” do, it may not be clear directly what “DisableSMB1” or “UninstallMsftBloat” do.
The script needs to be run with elevated privileges. It will apply all tweaks that are not blocked from execution. I suggest you create a backup of the system before you run the script. This may not be required if you run it right after setup, as you can simply install the operating system anew in this case.
Windows 10 Initial Setup Script comes with options to restore functionality to tweaks that have been applied previously. The reverse of each tweak is listed next to it in the interface. Simply remove the # in front of it and add the # symbol to the “disabling” tweak to restore the functionality.
You may also run the script using custom presets. This allows you to apply specific tweaks instead of all of them that are enabled currently in the script. A basic example is powershell.exe -NoProfile -ExecutionPolicy Bypass -File Win10.ps1 EnableFirewall EnableDefender which would only enable Firewall and Defender again. The preset names are all listed at the top of the script when you open it.
The script is compatible with Windows 10 and Windows Server 2016.
Win10 Initial Tweak Setup Script is a handy script to make changes quickly to Windows 10 and Windows Server 2016 devices. It is highly flexible when it comes to the tweaks, thanks to the support for custom presets, and supports a wide range of modifications that you can apply to the operating system.


/cdn.vox-cdn.com/uploads/chorus_image/image/64954617/jbareham_180917_2948_0384_02.0.jpg)